How to Optimize Your Amazon Product Listings: A Step-by-Step Guide
Keren Dinkin, Copywriter
15 min read -
Updated:Amazon has done for ecommerce what inventing the wheel did for transport. Some may say this is hyperbole, but the ecommerce industry can be clearly divided into two eras: Before Amazon and After Amazon. With Amazon’s rise, mastering an optimized Amazon product listing has become essential for success in the competitive marketplace.
This massive ecommerce platform has given millions of sellers with small and medium businesses the chance to go digital and the ability to reach a vast global audience that was out of their reach just a few years ago.
Today, any seller can simply upload an Amazon product listing, or Product Display Page (PDP) and rest easy in the knowledge that it will be viewed by thousands of interested buyers. All you need to do is create an engaging, detailed product listing to ensure you receive a high ranking on Amazon’s search engine results page (SERP).
According to data from Amazon’s own US Small Business Empowerment Report for 2022, over 60% of the sales on the website come from independent sellers like you. Competition is tough, so it may be time to revamp your products’ Amazon listings and optimize them to get maximum conversions for your brand.
This comprehensive guide covers all the steps and elements of creating, optimizing, and capitalizing on your best-performing PDPs.
Add Your What Is an Amazon Product Listing?
Amazon customers are spoiled for choice. They have dozens, if not hundreds, of other options to choose from if your product listing fails to engage and impress them. It’s the seller’s job to create optimized and detailed product listings that grab shoppers’ attention and get them to add the item to their carts and complete the purchase.
A good Amazon product listing performs two functions simultaneously:
- Shoppers searching for products in your category can easily discover your offerings.
- It convinces undecided customers to complete the purchase and drive conversions.
Amazon rewards businesses with the ideal placement on its search engine results for creating effective PDPs. The 2022 State of the Amazon Seller Report says that 89% of the sellers on Amazon made a profit that year. One of the ingredients to success is knowing how to create the right Amazon listings for products on your storefront.
However, putting up these listings that sell is not as simple as just filling out the details in an online form. There are many intricacies to crafting the perfect Amazon product listing, which we will cover in further detail.
Elements of Amazon Product Listings
To learn how to optimize your Amazon product listings, you first need to know what they consist of. Every listing shares a few elements in common—they are what shoppers expect to see when they click on a product page. You must optimize these elements to convert casual browsers and eager shoppers.
Amazon product listing elements can be broadly divided into two categories: ones that are in your control, and others that are not. In an ideal scenario, even the elements you don’t control will add value and show your company and products in a positive light.
Elements in Your Control
Here are Amazon product listing you will add yourself:
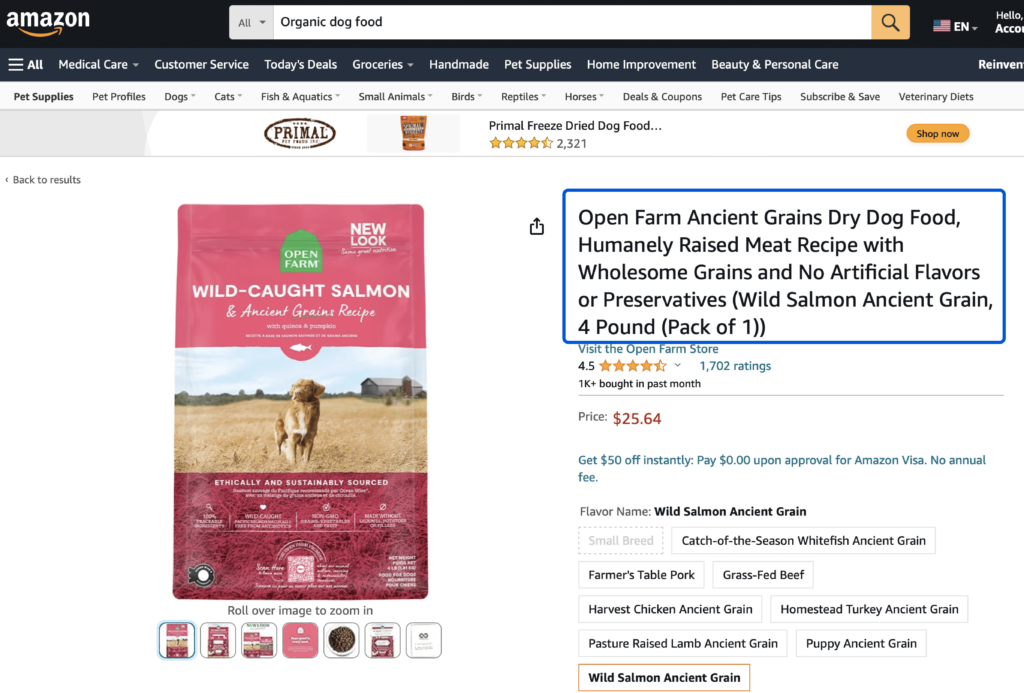
- Product title: This should make it immediately clear what item you are selling, including the brand name, model number, and other critical details. Amazon provides sellers a 200-character limit for product titles, so you can pack in a fair amount of information.
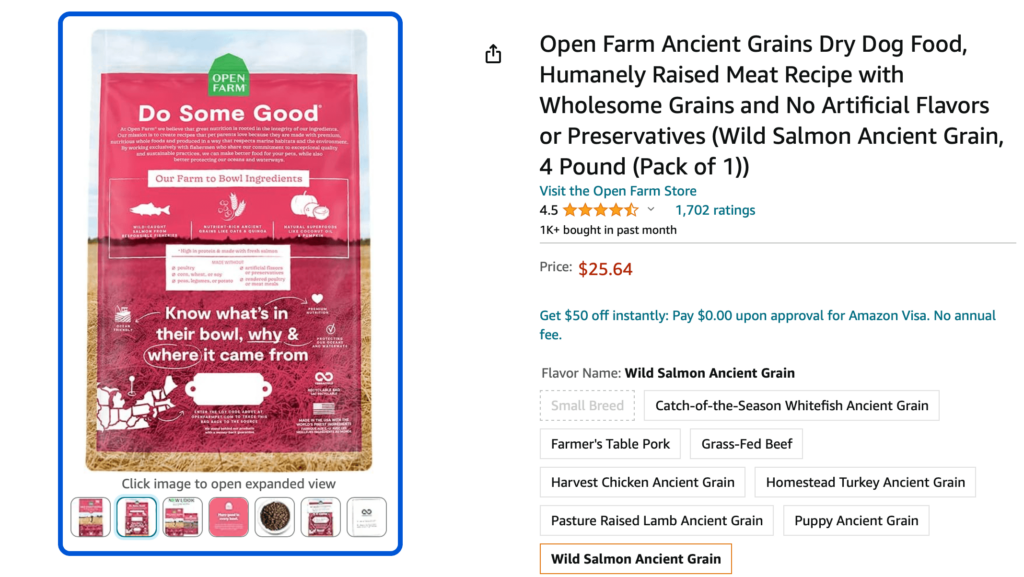
- Images: Without eye-catching photos, you’ll never attract customers to your Amazon store. Every product listing needs to include at least five images and must adhere to Amazon’s requirements. You can also include a short video of the product in action. Using effective ecommerce image optimization helps make sure your images look great, load fast, and show up better in search results.
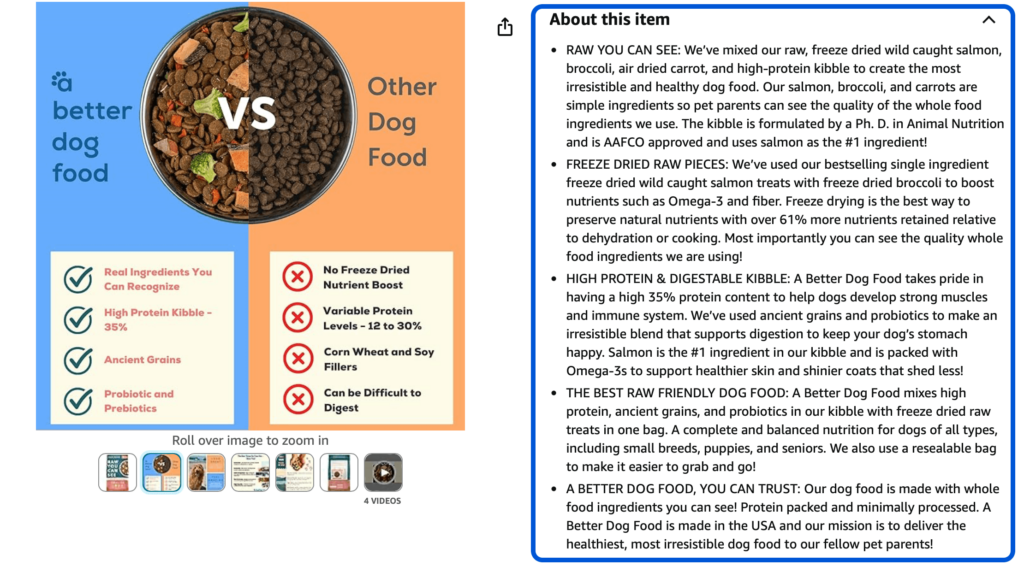
- Bullet points: This is where you can include more information about the product’s unique features and selling points. These bullet points are easier to read than a block of text, so they are a good place to integrate related keywords. They also occupy valuable real estate on the Amazon product page, close to the “Add to Cart” button. Try to make them as convincing as possible.
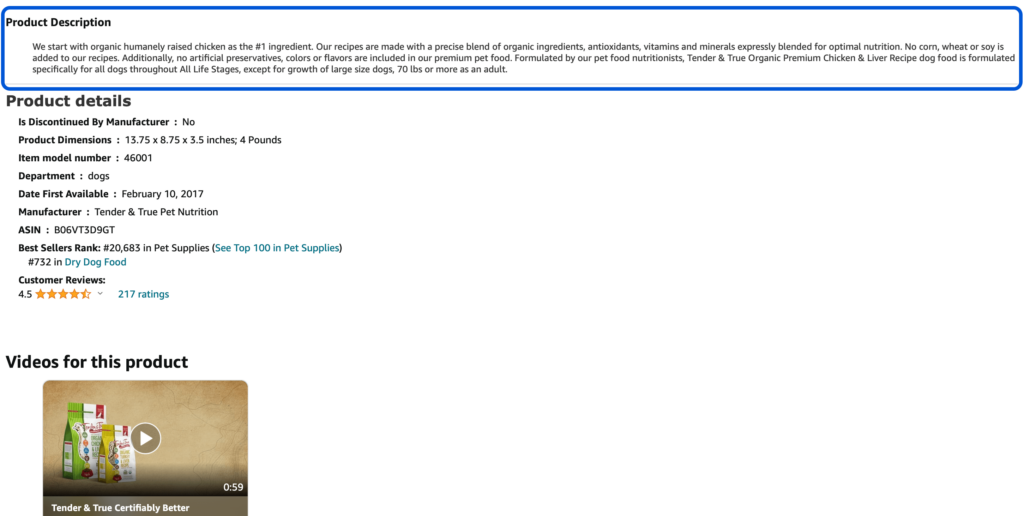
- Product description: This is where you can take advantage of the luxury of writing a longer description of your product and doubling down on your keywords. The field has a character limit of 2,000, so there is more than enough room to include a convincing sales pitch to your potential customers.
You should consider each of these elements carefully when creating a PDP on Amazon.
But no matter how particular you are about the content you include in your Amazon listings, there will always be elements that you cannot influence directly.
Elements Beyond Your Control
In every Amazon product listing, there are two elements that the seller has no control over. These are:
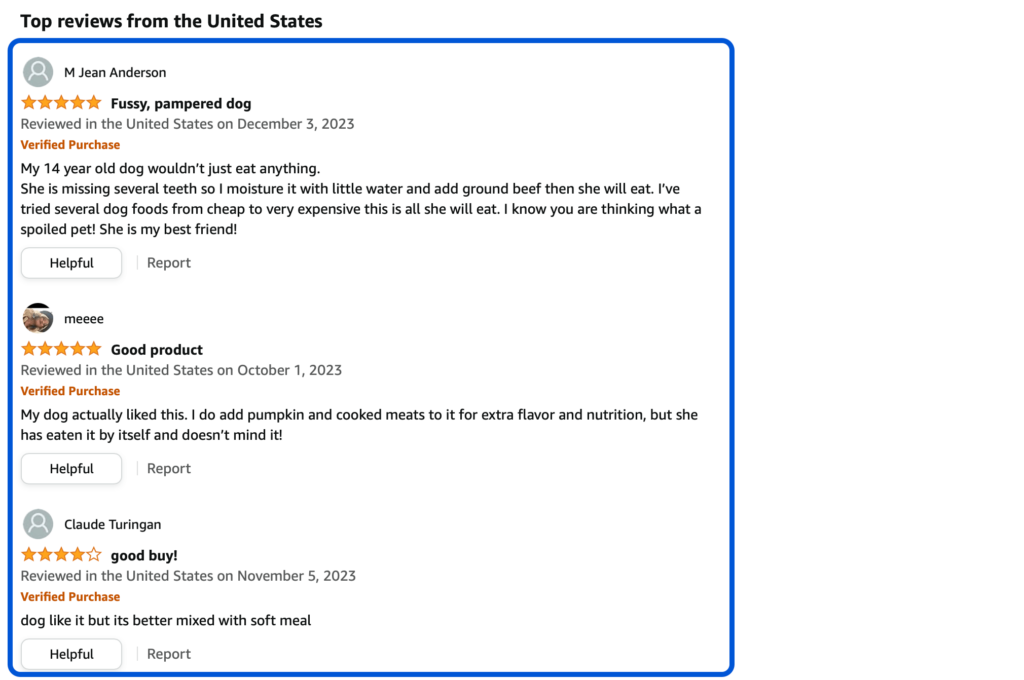
- Customer reviews: Amazon customers who have purchased the product can leave verified reviews that will always be visible on the listing page.
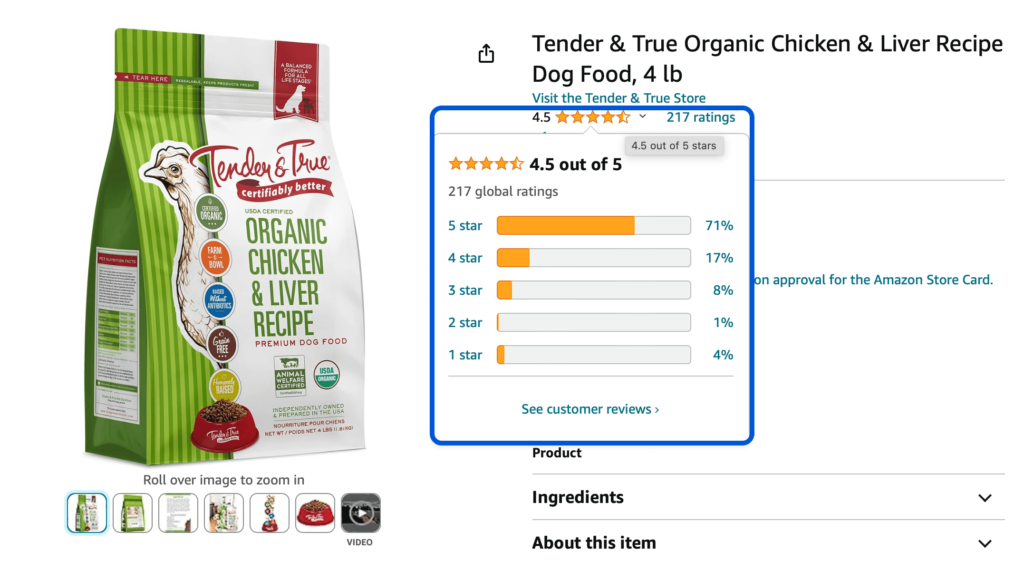
- Customer ratings: Your product’s customer ratings reflect how satisfactory buyers found it using a five-star system.
How to Get More Reviews on Amazon?
While it is true that the customers determine your product’s reviews and ratings, you can still try to tilt them in your favor. It’s crucial because positive reviews and high ratings will play a significant role in Amazon’s proprietary algorithm boosting your SERP ranking.
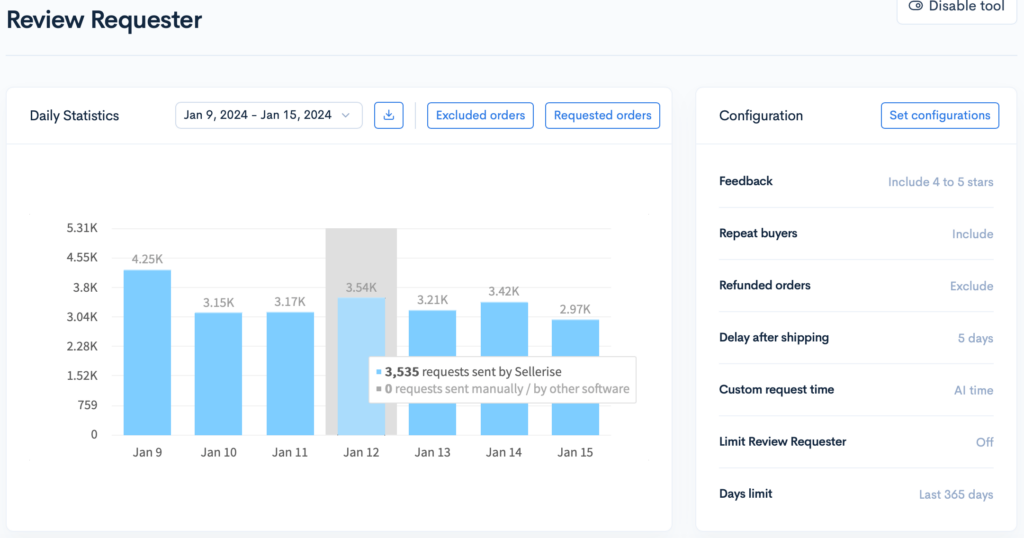
Use Sellerise Review Requester tool to automate product review requests. With this tool, you don’t need to manually request reviews from your customers. Instead, Sellerise does all the work for you, so you have more time on building your Amazon business.
Our customers noticed a 50% increase in reviews. Learn more.
Ensuring prompt order fulfillment without any delays or damaged goods is a reliable way to keep your customers happy. Remember, satisfied customers leave positive reviews, which encourage even more customers to purchase your product.
How to Deal with Negative Reviews?
Even if you receive negative reviews, taking the time to respond to the criticism in a professional and productive manner reflects well on your company. It lets future buyers know that you are aware of their problems and are willing to take steps to solve them.
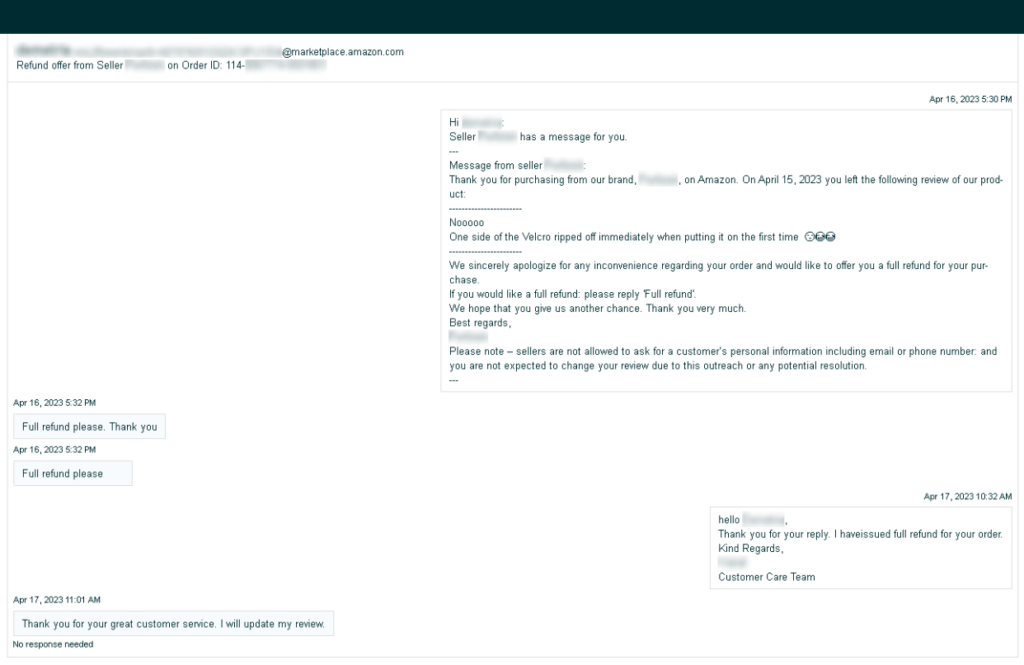
You can do this by using Sellerise Review Puncher tool that automatically sends emails to customers who have left negative reviews on your products, making it easier for Amazon sellers to manage their reviews and reputation. This simply means that Amazon sellers don’t need to send messages manually.
Isn’t it a great chance to lower your number of negative reviews? Well, trust us, it is! Plus, this is such a time saver.
Perfecting the Elements of Your Amazon Product Listing
Now you know the essential elements of an Amazon product listing page. You can now create a listing and go live, but the work does not stop there.
Optimizing Amazon listings is an exercise in constant iteration. You must continually tweak elements of the PDP and perhaps even carry out A/B testing to see what is getting you the most clicks and conversions.
The Importance of Optimizing Your Amazon Product Listings
The Amazon brand is a titan of the ecommerce industry and has a greater reach and broader distribution network than most independent sellers using the platform. So, product listings that match what Amazon’s algorithms are looking for and meet customer expectations at the same time can do wonders for your sales.
The numbers support this. In 2022 alone, Amazon recorded sales revenue of $514 billion. As the brand has continued its ecommerce dominance, it has become the go-to destination for most online shoppers. Customers in more than 100 countries and regions across the globe can discover, browse through, and ultimately buy your products on this platform.
The 2019 Amazon Consumer Behaviour Report found that 66% of online shoppers start their search for products on Amazon, and out of that number, 95% are satisfied with the platform’s search results.
With such a promising success rate, you need to do everything you can to get your product listing on the first page of Amazon search results. This is why optimizing your listings and ensuring they stand out from your competition is important.
Best Practices to Optimize Your Amazon Product Listings
The first page of Amazon’s search results is some of the most valuable real estate on the internet. There are thousands of sellers looking to move millions of products on the platform, so it takes an effort to cut through the noise and have your company’s items noticed.
The more items you sell, the more your SERP ranking will increase. But in order to get that ball rolling, you first need to create compelling Amazon product listings. That means taking the time to optimize every field on the page.
These are the best practices to keep in mind when creating each element of your Amazon product listing:
1. Product Titles
This is the first thing shoppers see when looking up search terms, so your product title needs to create a strong first impression. It should sum up the nature of the product so anyone browsing the site will understand what it offers in a single glance.
The average length for optimized product titles is 200 characters, with a maximum of 250 and a minimum of 80 characters for mobile optimization.
Most people use smartphones and other mobile devices to shop, so the first 80 characters of the title are of prime importance. Include a relevant, high-volume keyword to reel in interested customers. The rest of the title can contain other information that will set your offerings apart, such as the brand name, model type, size, and color.
Here are more tips to keep in mind when crafting product titles:
- Stick to a set template for all product titles, such as brand name and product type, followed by a high-ranking keyword.
- Use title case and not all caps.
- Use numerals for numbers.
- Avoid punctuation symbols and emojis.
- Do not mention the product price in the title.
Getting your product title right is the first step to converting curious online window shoppers into paying customers.
2. Bullet Points
Once customers land on your product page, they will first seek out more details about the item they’re interested in. The bullet points section is supposed to provide that information straight away. This is where you can drive home what makes your product unique in five short and emphatic statements.
To make them easier to read, each bullet point should be around 170 to 200 characters. It is also important to include related keywords in this section to further optimize your listing.
When writing bullet points for your Amazon products, remember the following best practices:
- Stick to a uniform length for each bullet point.
- Begin with capital letters and use sentence case throughout.
- Highlight how the product will benefit buyers.
- Don’t use HTML or other types of coding or formatting.
- Do not place promotional offers or pricing information in this section of the listing.
The key thing to remember when writing bullet points for your Amazon listing is to keep them brief, informative, and easily digestible in one glance.
3. Images and Videos
The written copy on your product display page is meant to appeal to shoppers’ desires. But, as an online shopper yourself, you likely already know that a picture is worth a thousand words.
Potential buyers are savvier than ever, and they will want to take a close look at your product before they buy it. Your Amazon listing is the best place to show it off to its best advantage.
You can upload a maximum of ten images for every item, but it’s most efficient to post only five to seven. This should be enough for customers to understand what the product looks like from all angles and get an idea of its dimensions, functions, and quality.
If you’re including video as well, it’s best to stick to just one. After all, it’s crucial for product pages to load smoothly for all users, and making the page heavier with too much content isn’t a good idea. A simple product video highlighting all of its features or a demonstration of the product being used will help answer any questions that customers may have.
When creating media in your product listing, keep these guidelines in mind:
- Use well-lit, clear photos that feature the product prominently.
- Include product pictures with a plain white background.
- Stick to the JPEG file format when uploading images.
- Consider including dimension charts, blueprints, or other infographics.
- Ensure all media meets Amazon’s mandated requirements.
If your images and videos show off your products in a flattering light, customers will be much more willing to buy from you instead of your competitors.
4. Product Description
The product description section of every PDP is quite far down and won’t attract as many eyeballs as the bullet points and images. But this doesn’t mean you should take it for granted. It is still a critical element of your listing.
You must include a minimum of 500 and a maximum of 1,900 characters for your product listing. This is your chance to outline any additional information that was left out in the other sections. You must also include more relevant keywords to further improve your PDP’s Amazon search engine optimization (SEO) performance.
To write a high-quality product description, be mindful of the following:
- Include specific information about item size and color.
- List all the materials used to make the product.
- Describe the quality of the packaging.
- Share details on shipping timelines and methods.
Don’t repeat any information in your product description. Instead, speak directly to the customer and convince them that your product is the one they have been looking for.
5. Backend Keywords
Some elements of your product listing will not be visible to browsing customers. These backend keywords are also known as search terms and are used by Amazon to index product pages and enhance their discoverability. Integrating backend keywords will help you reach more window shoppers who might be looking up products that are similar to yours.
Here’s how you can maximize the effectiveness of your backend keywords:
- Use all synonyms and alternate names for the item.
- Don’t use any punctuation or stop words like “a,” “an,” or “the.”
- Use only spaces to separate search terms.
- Avoid repeating terms at all costs.
The judicious use of backend keywords can help give your Amazon product listing a big boost in the SERP rankings.
6. A+ Content
Amazon Verified Sellers have the privilege of being able to include A+ content on their product listings. A+ content is essentially high-quality multimedia that can enrich a customer’s experience while visiting your page. It includes HD videos, detailed charts, and additional copy.
Once you’ve uploaded the A+ content from your Amazon Seller account, it will take seven days for it to be verified by the platform before it appears on your product page.
7. Optimized Pricing
Despite everything else on your Amazon product listing, no other element has as much influence on the customer’s final decision as the item’s price. Ultimately, Amazon’s algorithm gives significant weight to the total number and frequency of product sales, so finding a price point that is attractive to customers is critical.
You can offer discounts or mark your prices up and down as you please, but the best approach would be to calibrate according to your competitors and other similar products. This is because Amazon’s algorithm compares prices of related items to determine if each one has been priced appropriately.
An Easy Six-Step Guide to Creating Amazon Product Listings
Now that you know how to optimize the content on your Amazon product listings, all that’s left is to create them. Follow each step in the guide below, and you will be ready to welcome a new influx of online shoppers.
Step 1: Conduct Keyword Research with Keyword Hunter
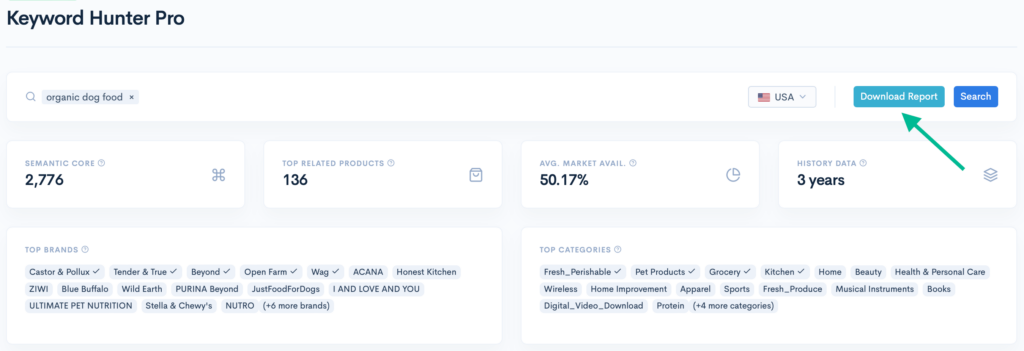
Finding the right keywords is crucial to reaching your target audience. The first step in optimizing your Amazon product listings is conducting thorough keyword research. Instead of guessing what your potential customers are searching for, use Sellerise’s Keyword Hunter tool to uncover high-performing keywords.
Here’s how:
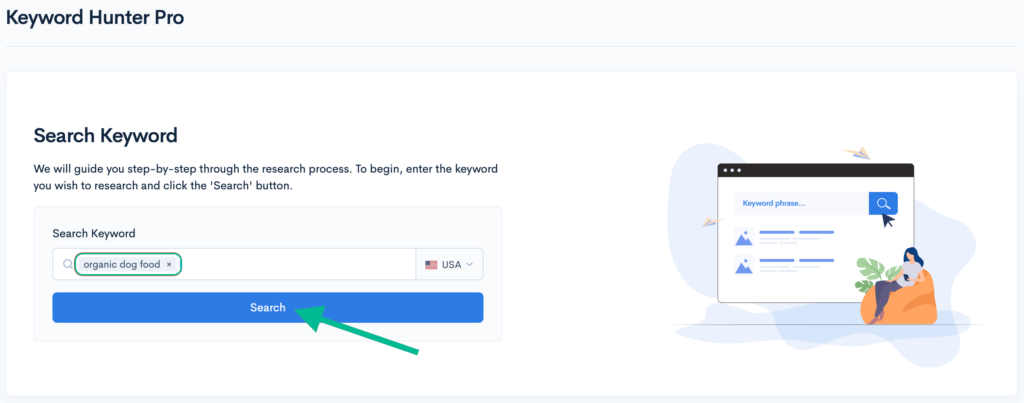
- Start by selecting your marketplace in the Keyword Hunter tool.
- Enter your main product keyword that precisely explains your Amazon product.
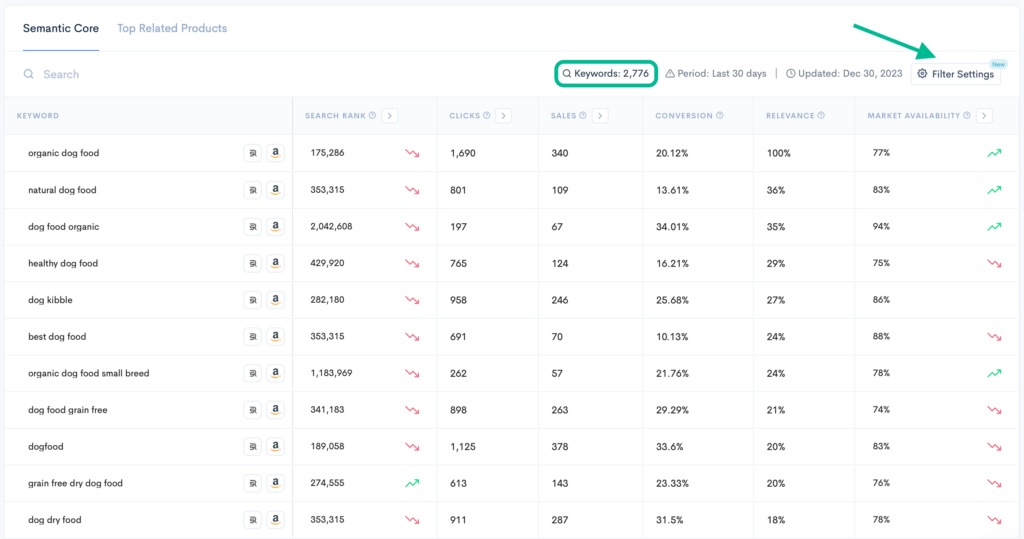
Once you hit “Search,” Keyword Hunter will generate a list of relevant keywords, along with crucial data like search rank, organic clicks and sales, conversion rate of every keyword market availability, and more.
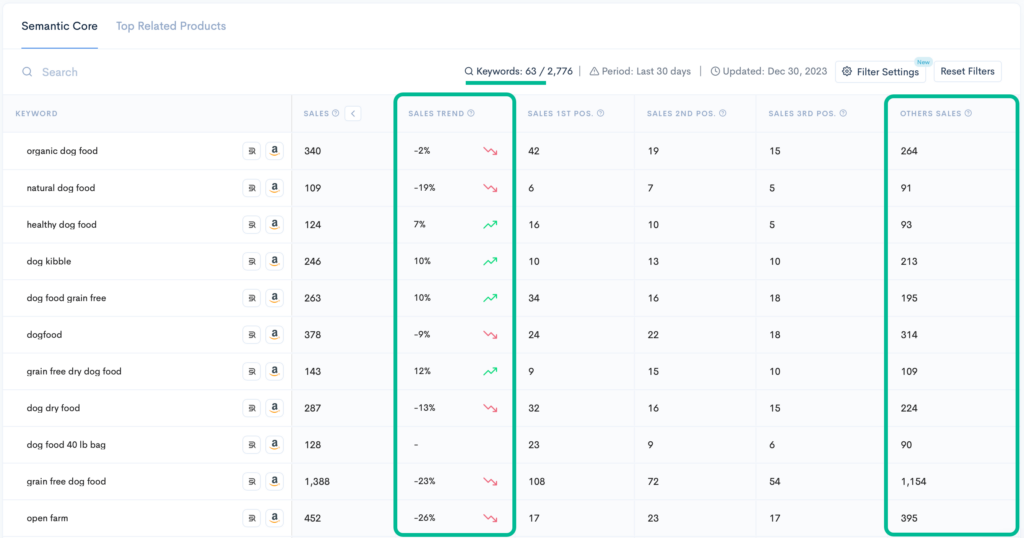
- Review the list and identify keywords that are most relevant to your product and have a high conversion rate but lower competition.
There are two types of keywords you will need to use:
- Short-tail keywords: Single words or short terms with high search volumes
- Long-tail keywords: Specific phrases that have a direct relation to your product
While short-tail keywords might bring you more clicks, long-tail keywords usually lead to more conversions. This is why it’s so important to do your research and use a blend of both types of keywords.
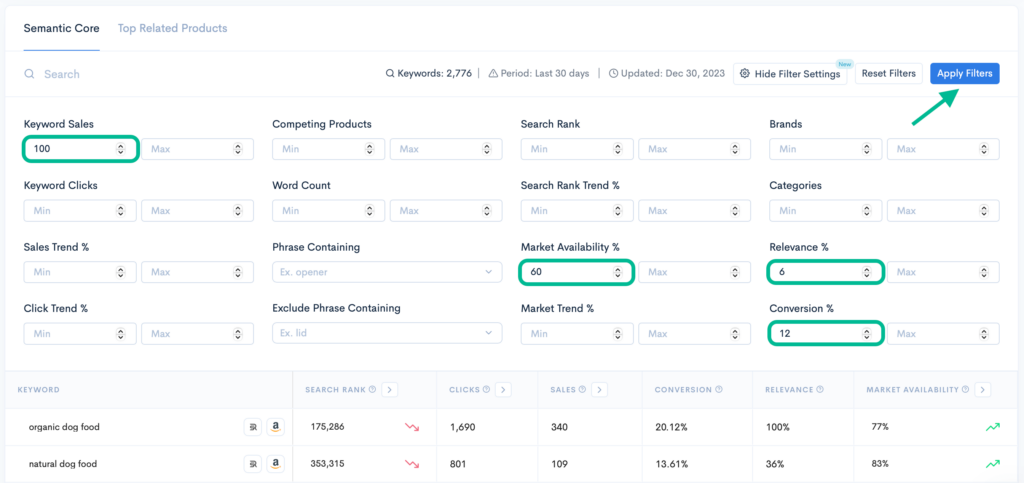
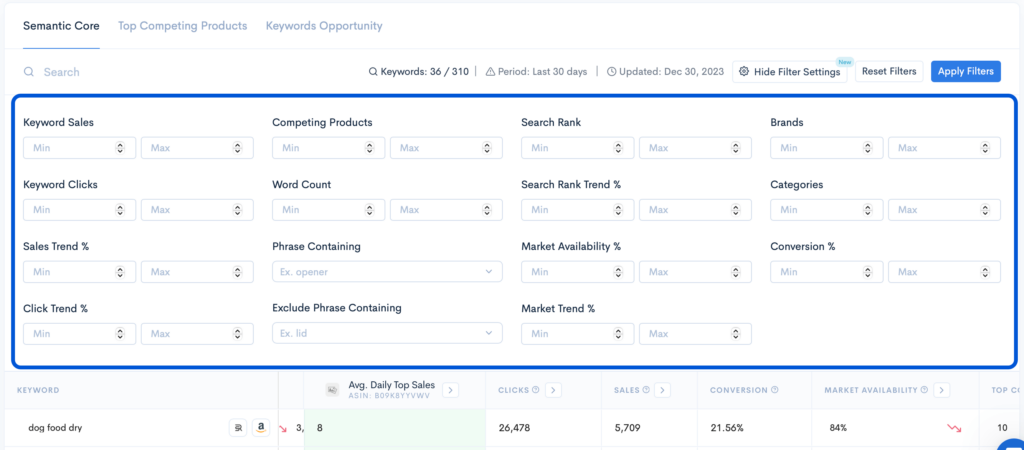
- Use filters to narrow your keyword search.
- You can then select these keywords and export them to an Excel file.
Drive organic traffic to your listings by identifying fresh keyword opportunities, analyzing their availability and the existing competition, and tracking their performance over time. Start your 7-day free trial.
We described the first important step when creating your Amazon product listing. And there is more below.
Step 2: Spy on Competitors' Keywords with the Keyword Re-Ranker Tool
Consider the search terms your target customers may use to look up your item and survey what keywords your competitors are using on their pages to start building your keyword strategy. Use competitor keywords research tools, such as Sellerise’s Keyword Re-Ranker tool.
Here’s how to use it:
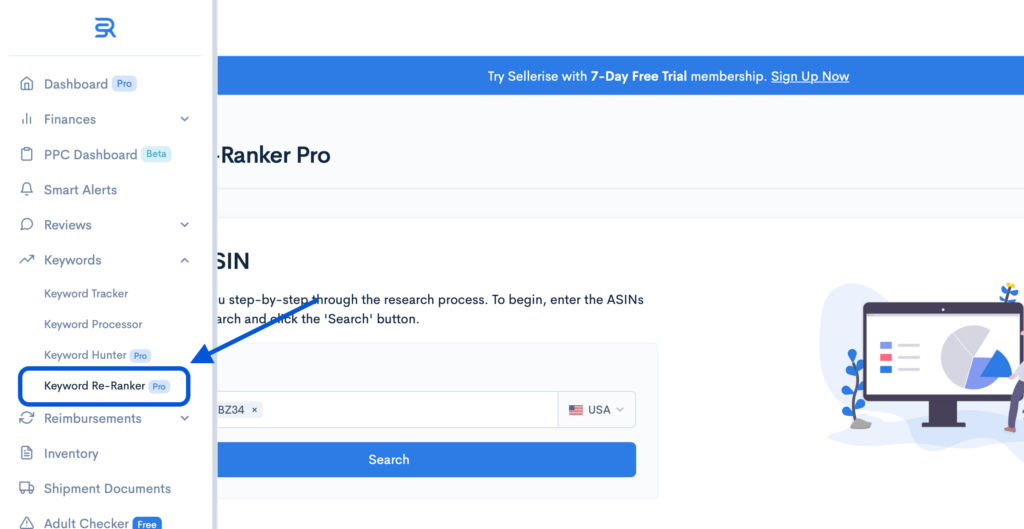
- Navigate to the Keyword Re-Ranker Pro tool in Sellerise.
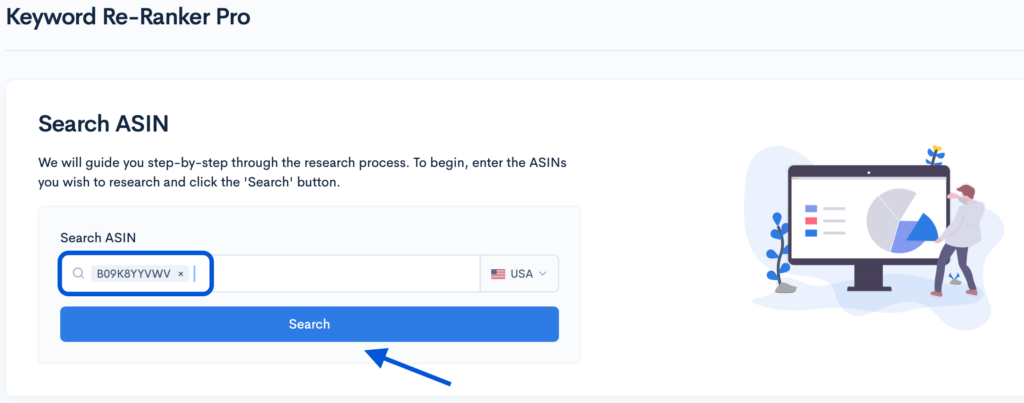
- Enter up to 10 ASINs of your top competitors’ products.
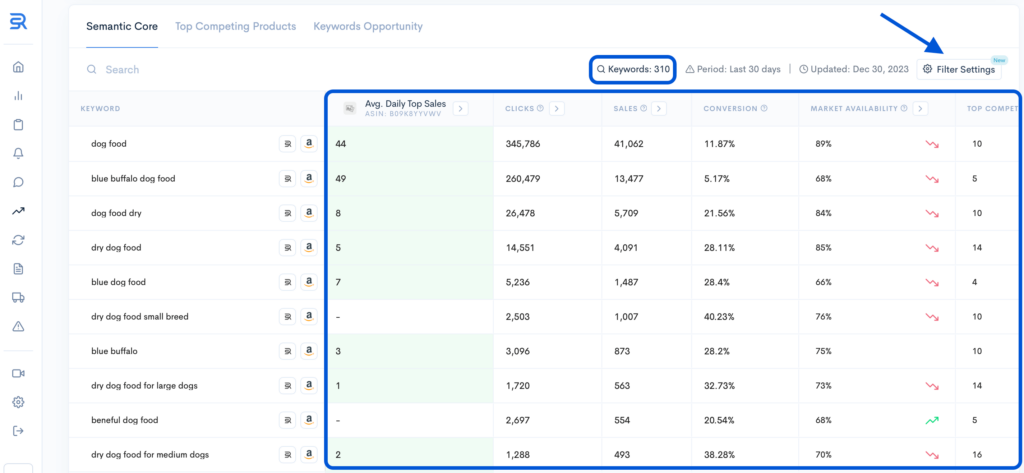
- Re-Ranker will then reveal a list of keywords that bring your competitors to the top positions. This information includes search rank, organic clicks/sales, market availability, offering a comprehensive view of their keyword strategy.
- Use ‘Filter Settings’ to get the most relevant and sales-making keywords.
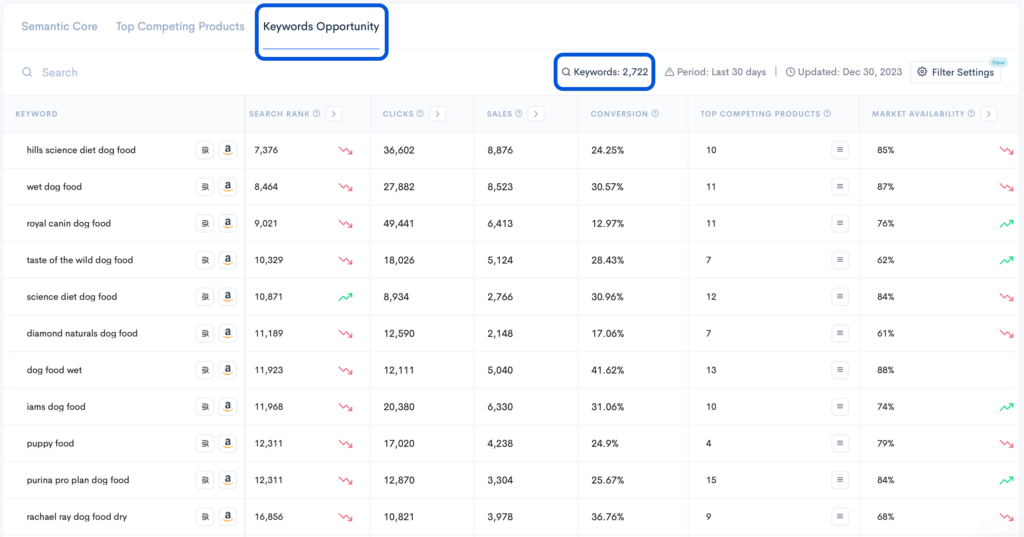
- From this list, you can spot opportunities where your competitors are lacking, and target these keywords in your own listings.
- Similar to the Keyword Hunter tool, you can export these insights to an Excel file or use them directly to optimize your listings.
- Combine keyword lists from Keyword Hunter and Re-Ranker. Get highly relevant and sales making keywords, and start using them in product title, description, bullet points.
Comprehensive keyword analysis of your competition’s products will reveal even more opportunities for growth. When you know what works for them, you can adjust your own optimization strategies and expand your knowledge about current market dynamics.
Sellerise also has a suite of other tools that help you review, analyze, and manage every aspect of your Amazon business.
Step 3: Prioritize High-Converting Keywords of Your Own Product
Once you’ve collected a list of potential keywords and checked competitor strategies, the next step is to understand which of your own keywords actually drive sales — not just clicks.
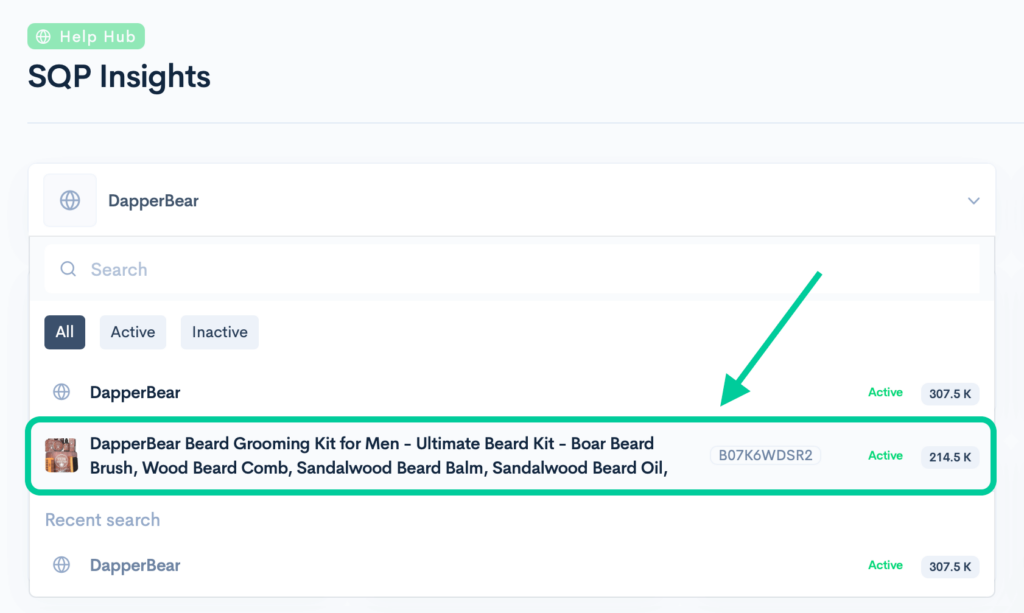
1. Select your Product in SQP Insights
Start by choosing your product you would like to analyze. SQP Insights pulls data on all the search terms connected to your product — including impressions, clicks, and conversion rates.
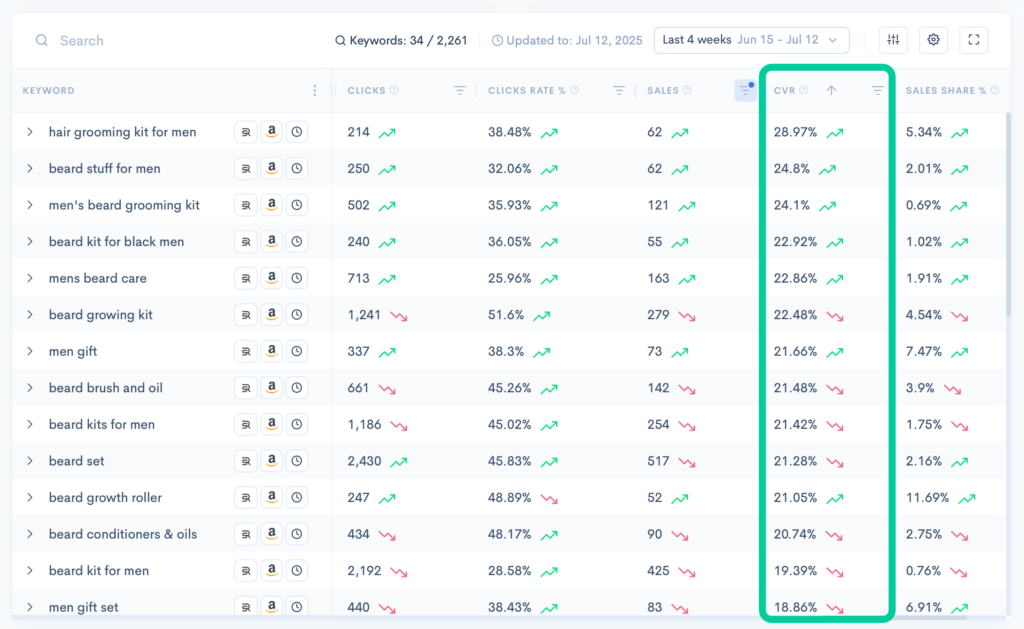
2. Sort keywords by conversion rate
Look at which search terms don’t just attract visitors but actually lead to purchases.
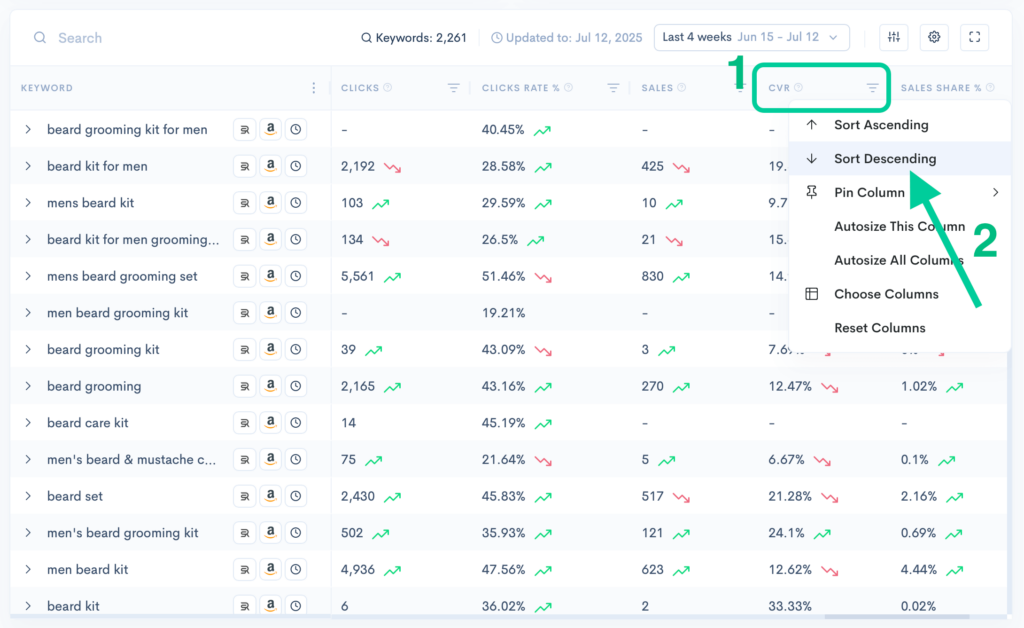
These are your high-converting keywords — make sure they’re reflected in your product title, bullet points, backend keywords, and PPC campaigns.
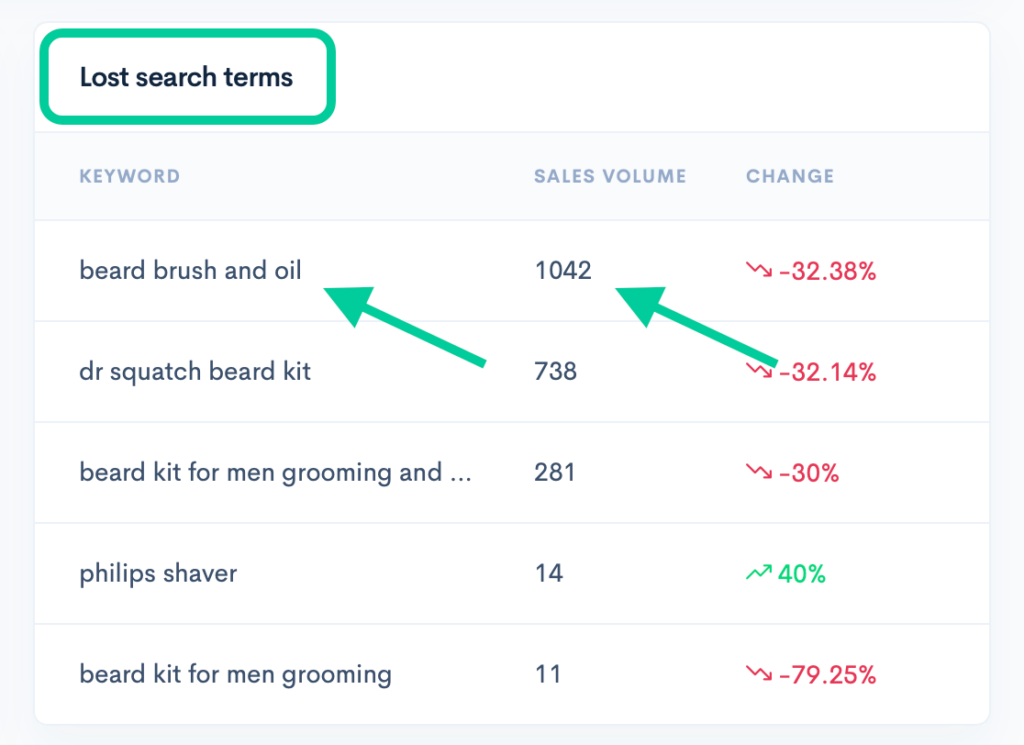
3. Spot lost or underperforming keywords
Identify terms that bring a lot of clicks but few conversions. These might need:
Better alignment between the search intent and your listing content
Adjustments to images, pricing, or bullet points
Reconsidering in your PPC strategy (for example, lowering bids).
4. Refine and prioritize
Once you have a clear picture, adjust your keyword strategy:
Prioritize what’s working
Fix or drop what’s underperforming
Experiment with untapped opportunities.
5. Recheck regularly
Keyword performance shifts over time. Make it a habit to revisit SQP Insights regularly to keep your listings aligned with actual shopper behavior.
Step 4: Log in to Amazon Seller Central
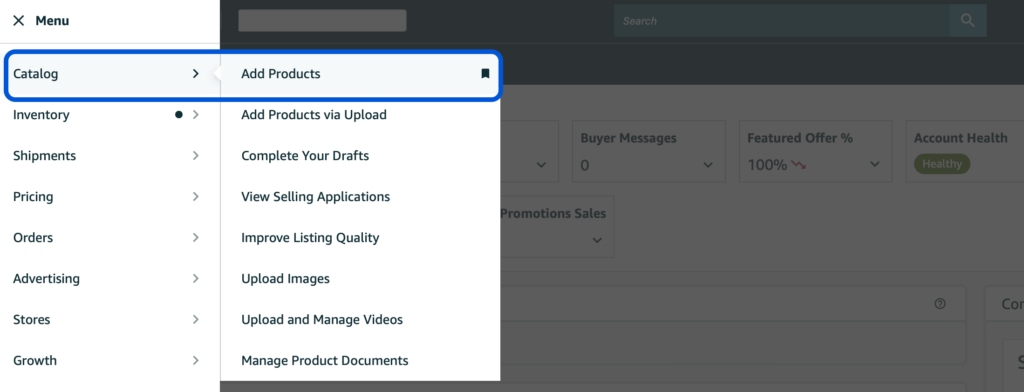
To create a new listing, simply log in to Amazon Seller Central and go through the following steps:
- Open the left sidebar
- Select “Catalog”
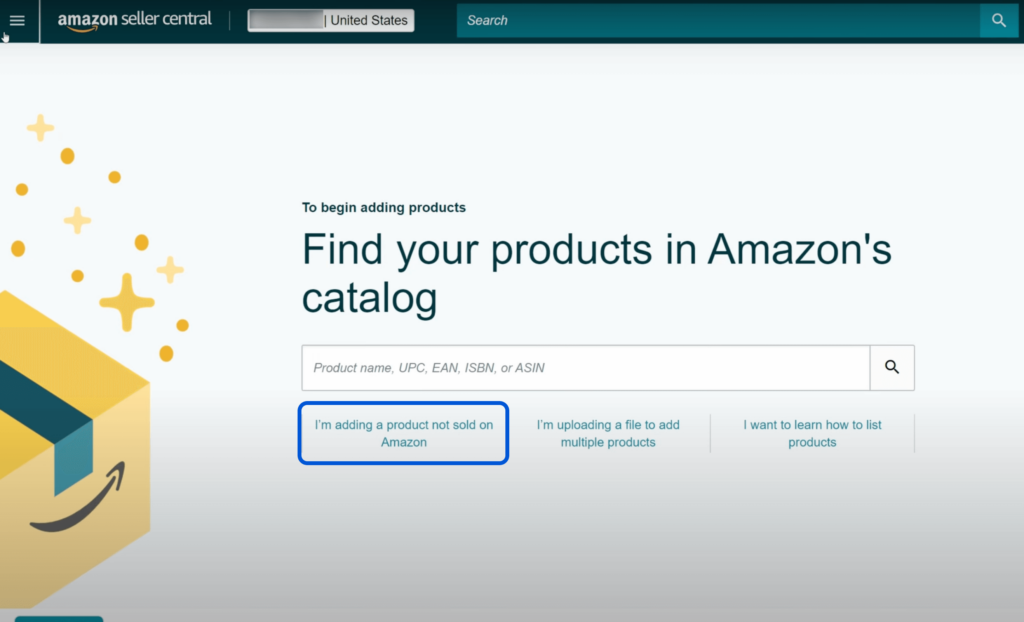
- Select “Add Products”
- Choose the appropriate option
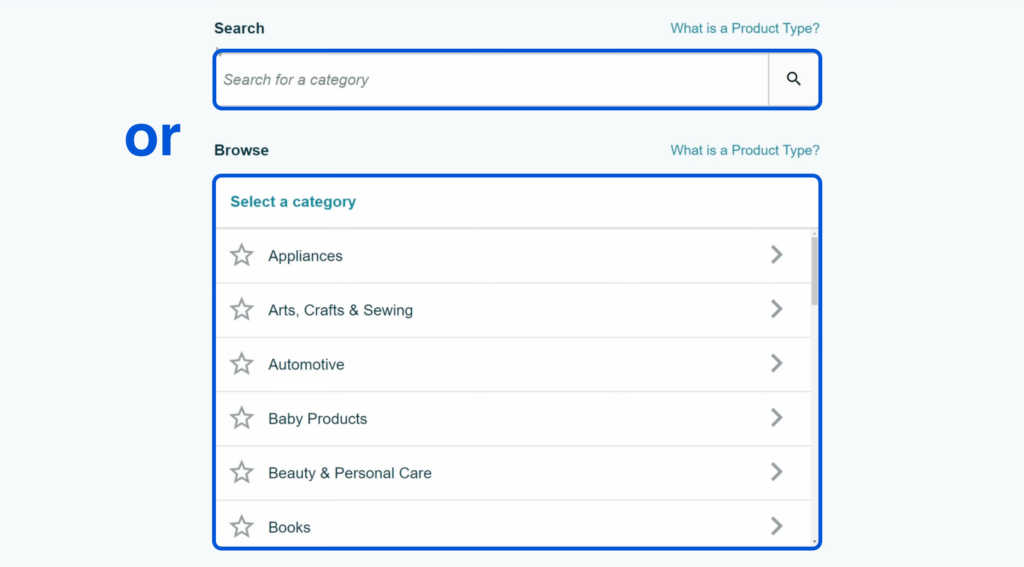
Step 5: Choose Your Product’s Category
Your product’s category and subcategory are important because they tell the algorithm where to display the item on the platform. You can choose them from the available list or search for similar products and follow along.
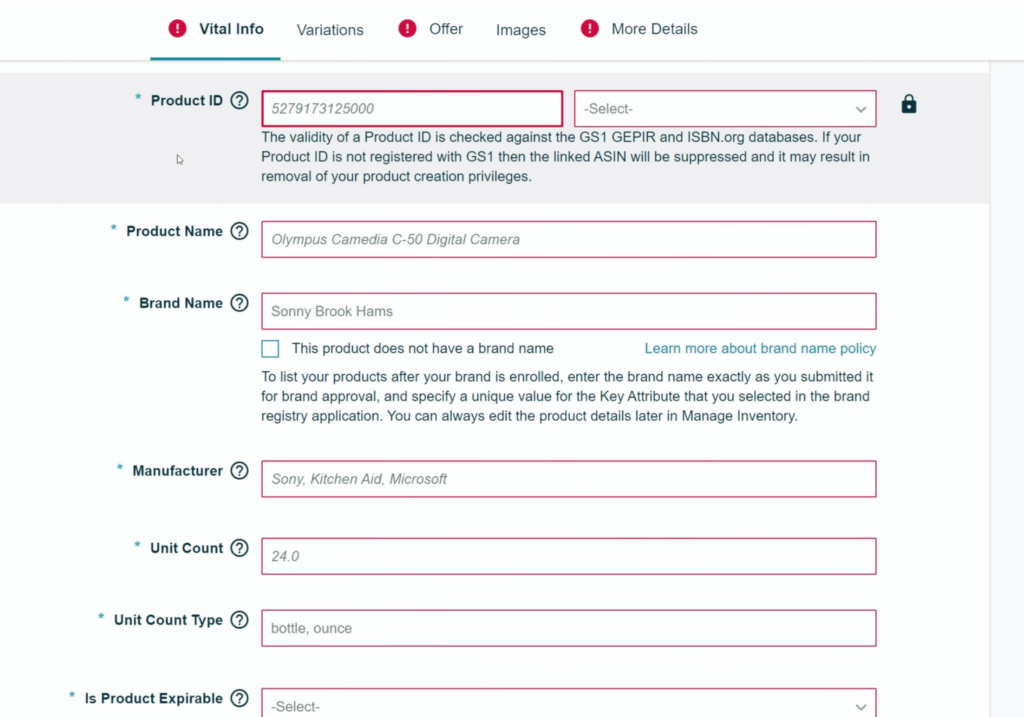
Step 6: Add the Product Details
Now comes the real work of populating your Amazon listing with all the elements that will make it special.
This is the part where you fill in the following fields:
- Product title
- Product images
- Product details
- Bullet points
- A+ content
- Keywords and search terms
- Pricing
We’ve already covered the best practices when it comes to creating these elements; this is where you put those lessons into practice.
Step 7: Save and Finish
Congratulations! You’ve successfully completed creating an optimized Amazon product listing. All that’s left is to hit the “Save and Finish” button, and your product page will go live.
Conclusion
Ecommerce is an exciting industry to be in, and you set yourself up for success if you are committed to trying new approaches. Optimizing Amazon product listings is a gradual process, and you will get better at it with time. Until then, having the right tools and software to work with will put you on the right track!
Keren Dinkin, Copywriter
Professional in digital marketing and content creation, with 7 years of experience in the field. Keren has a strong background in e-commerce, helping businesses grow their online presence and achieve their goals.
